All Stories

Tuesday 31 December 2013


Tips to become a professional blogger

Blogging is one of the most entertaining things that one can do to pass on his/her time. Depending on the traffic a blog receives, it can get rewarding too. Today I am going to write an article which will tell you a few tips on how to become a professional blogger.


1. Start fresh. 

Always think before creating a blog. Think about what you are going to blog about. It should be about something that you know much about and love talking about. Something fun and creative that everyone should like . Honestly speaking, no one is interested on how you got through your day. People need help, they needs entertainment, and you should need to give them what they want.
 

2. Make your blog good looking. 
 
Choose fresh, easy to navigate and good looking templates for your blog. Host sites like WordPress and Blogger provide good looking templates which you can use to make your blog look attractive.
 
3. Have fun. 
 
While you start blogging, make sure, you are having fun. Don’t blog with the motive of being bored or tired. If you get frustrated or bored quickly, blogging probably isn’t for you.
 
4. Blog regularly. 
 
Update your blog regularly and, it would be best if you could post minimum of one post per day. People don’t like to wait for days for new posts. Almost all of the most popular blogs have posts like every hour! Make sure that you update your blog regularly. This will keep you visitors interested and they will come back for more and eventually follow the blog!
 
5. Don’t hide behind the curtain. 
 
At times talk to your viewers about yourself. For example if it’s about a vehicle like a motorbike, talk to them about your experience with it. Also having an “About us” page which will tell your audience about your blog is a very good idea.
 
6. Be patient. 
 
Don’t expect your posts to go viral in a number of days. Blogs take months or even years to get decent fans. All you need to do is to keep posting and never give up.
 
7. Try to learn from your audience. 
 
Take opinions from your visitors, ask them what they are interested in and how you can help them. Think of it as a community, where you need to get to them and they need to get back to you.

Tips to become a professional blogger


Tips to become a professional blogger

Blogging is one of the most entertaining things that one can do to pass on his/her time. Depending on the traffic a blog receives, it can get rewarding too. Today I am going to write an article which will tell you a few tips on how to become a professional blogger.


1. Start fresh. 

Always think before creating a blog. Think about what you are going to blog about. It should be about something that you know much about and love talking about. Something fun and creative that everyone should like . Honestly speaking, no one is interested on how you got through your day. People need help, they needs entertainment, and you should need to give them what they want.
 

2. Make your blog good looking. 
 
Choose fresh, easy to navigate and good looking templates for your blog. Host sites like WordPress and Blogger provide good looking templates which you can use to make your blog look attractive.
 
3. Have fun. 
 
While you start blogging, make sure, you are having fun. Don’t blog with the motive of being bored or tired. If you get frustrated or bored quickly, blogging probably isn’t for you.
 
4. Blog regularly. 
 
Update your blog regularly and, it would be best if you could post minimum of one post per day. People don’t like to wait for days for new posts. Almost all of the most popular blogs have posts like every hour! Make sure that you update your blog regularly. This will keep you visitors interested and they will come back for more and eventually follow the blog!
 
5. Don’t hide behind the curtain. 
 
At times talk to your viewers about yourself. For example if it’s about a vehicle like a motorbike, talk to them about your experience with it. Also having an “About us” page which will tell your audience about your blog is a very good idea.
 
6. Be patient. 
 
Don’t expect your posts to go viral in a number of days. Blogs take months or even years to get decent fans. All you need to do is to keep posting and never give up.
 
7. Try to learn from your audience. 
 
Take opinions from your visitors, ask them what they are interested in and how you can help them. Think of it as a community, where you need to get to them and they need to get back to you.

Posted at 07:23 |  by Unknown

2 comments:

Saturday 28 December 2013

Google AdSense

There are two types of Adsense account i.e. hosted AdSense account and non-hosted AdSense account. Some people didn't know the difference between these accounts. Hence they got confused while applying for an AdSense account. So, Today I am going to explain how these accounts are different from each other.

Hosted Adsense Account:  

This is the account which can be approved easily from Google hosted sites like You Tube, Blogspot or Hub pages. This means that if you have a  hosted-adsense account.  You may not use this AdSense account at any  domain name / site. You can show Adsense ads with this account only in You tube, blogspot, Hub pages (sites that allow you to apply for and use codes Adsense ads on their domains)

Some advantages and disadvantages of Hosted AdSense account : 

  • It can be easily approved by using You tube.
  • You can earn money from You Tube.
  • You can also earn money from YouTube live events.  
  • One of the major dis advantage of a hosted AdSense account is that we can’t use it in website i.e. we can't use it elsewhere except google hosted sites like You tube, blogger, etc.

Normal or publisher Adsense Account:  

By a non-hosted/publisher AdSense account we can earn money from YouTube and from our website also. We can use this account for another proposes also like AdSense for Search, AdSense for games, etc. This account is fully approved and do not have to reapply for any other services. We can directly apply for AdSense account using the main adsense site with our site. We can also change a non-hosted adsense account to a hosted adsnese account.

Some advantages and dis advantages of Non-hosted AdSense account:

  • It can be easily applied using YouTube account.
  • You can make money from YouTube Videos and as well as from YouTube live events.  
  • You can use it in your website.
  • You can use it in your Mobile, windows application & earn money from it.


Difference between hosted and non-hosted AdSense account

Google AdSense

There are two types of Adsense account i.e. hosted AdSense account and non-hosted AdSense account. Some people didn't know the difference between these accounts. Hence they got confused while applying for an AdSense account. So, Today I am going to explain how these accounts are different from each other.

Hosted Adsense Account:  

This is the account which can be approved easily from Google hosted sites like You Tube, Blogspot or Hub pages. This means that if you have a  hosted-adsense account.  You may not use this AdSense account at any  domain name / site. You can show Adsense ads with this account only in You tube, blogspot, Hub pages (sites that allow you to apply for and use codes Adsense ads on their domains)

Some advantages and disadvantages of Hosted AdSense account : 

  • It can be easily approved by using You tube.
  • You can earn money from You Tube.
  • You can also earn money from YouTube live events.  
  • One of the major dis advantage of a hosted AdSense account is that we can’t use it in website i.e. we can't use it elsewhere except google hosted sites like You tube, blogger, etc.

Normal or publisher Adsense Account:  

By a non-hosted/publisher AdSense account we can earn money from YouTube and from our website also. We can use this account for another proposes also like AdSense for Search, AdSense for games, etc. This account is fully approved and do not have to reapply for any other services. We can directly apply for AdSense account using the main adsense site with our site. We can also change a non-hosted adsense account to a hosted adsnese account.

Some advantages and dis advantages of Non-hosted AdSense account:

  • It can be easily applied using YouTube account.
  • You can make money from YouTube Videos and as well as from YouTube live events.  
  • You can use it in your website.
  • You can use it in your Mobile, windows application & earn money from it.


Posted at 04:30 |  by Unknown

0 comments:

Thursday 26 December 2013

Hello Bloggers, Me Harry and today I provided you a awesome subscription box. In this widget we added social media networks icon so you can also place your social media links here and get more traffic. Social media sites are most important parts of our sites in these days because all peoples use these networks and it is very important to gave the daily users an simple way to subscribe in order to got new and latest updates in their inbox and stay connected with us. So in this box are social media networks are added and you can add this subscription box or widget to your blog from below. Read below and use this widget. We also place a Live Demo below you can check it below.


Learn How To Add This To Your Blog.

1) Open Your Blogger Account.

2) Open Your Layout of Blogger.

3) Click On Add a Gadget Button.

4) Then Click on HTML/Javascripts.


5) Paste The Below Code In It.


<style>
.subscribebtrix {
border: 2px solid #000000;
padding: 8px;
width: 310px;
-webkit-transition: all 0.5s ease-in-out;
-moz-transition: all 0.5s ease-in-out;
-ms-transition: all 0.5s ease-in-out;
-o-transition: all 0.5s ease-in-out;
transition: all 0.5s ease-in-out;
}
.subscribebtrix:hover {
-moz-box-shadow: inset 1px 1px 10px 1px rgba(249, 215, 126, 1);
-webkit-box-shadow: inset 1px 1px 10px 1px rgba(249, 215, 126, 1);
box-shadow: inset 1px 1px 10px 1px rgba(249, 215, 126, 1);
}
.tbimailbox {
border: 1px solid #D3D3D3;
-webkit-border-radius: 4px;
border-radius: 4px;
-moz-box-shadow: 1px 1px 1px 1px rgba(255, 172, 84, 0.4) inset;
-webkit-box-shadow: 1px 1px 1px 1px rgba(0, 0, 0, 0.4) inset;
box-shadow: 1px 1px 1px 1px rgba(0, 0, 0, 0.4) inset;
color: #666;
font: 14px "trebuchet ms", sans-serif;
padding: 7px 15px;
width: 160px;
-webkit-transition: all 0.5s ease-in-out;
-moz-transition: all 0.5s ease-in-out;
-ms-transition: all 0.5s ease-in-out;
-o-transition: all 0.5s ease-in-out;
transition: all 0.5s ease-in-out;
}
.tbimailbox:hover {
-webkit-box-shadow: none;
box-shadow: none;
-webkit-transition: all 0.5s ease-in-out;
-moz-transition: all 0.5s ease-in-out;
-ms-transition: all 0.5s ease-in-out;
-o-transition: all 0.5s ease-in-out;
transition: all 0.5s ease-in-out;
}
.btrixsubmit {
font: bold 12px Tahoma, Geneva, sans-serif;
font-style: normal;
color: #ffffff;
background: #ff5714;
border: 0px solid #ffffff;
text-shadow: 0px -1px 1px #222222;
box-shadow: 2px 2px 5px #000000;
-moz-box-shadow: 2px 2px 5px #000000;
-webkit-box-shadow: 2px 2px 5px #000000;
border-radius: 10px 10px 10px 10px;
-moz-border-radius: 10px 10px 10px 10px;
-webkit-border-radius: 10px 10px 10px 10px;
padding: 8px 15px;
cursor: pointer;
margin: 0 auto;
}
.btrixsubmit:active {
cursor: pointer;
position: relative;
top: 2px;
}
.btrixsubmit::-moz-focus-inner {
border: 0;
padding: 0;
margin: 0;
}
</style>

<br />
<div class="subscribebtrix">
<div style="color: #666666; font-weight: bold; font: 22px Oswald, cursive; margin: 0px 0px 10px 15px;">
Free Updates to your Inbox</div>
<div style="margin: 10px 0 0 6px;">
<form action="http://feedburner.google.com/fb/a/mailverify" class="emailform" method="post" onsubmit="window.open('http://feedburner.google.com/fb/a/mailverify?uri=MyGalaxyTricks', 'popupwindow', 'scrollbars=yes,width=550,height=520');return true" style="margin: 0pt;" target="popupwindow">
<input name="uri" type="hidden" value="MyGalaxyTricks" />
<input name="loc" type="hidden" value="en_US" />
<input class="tbimailbox" name="email" onblur="if (this.value == &quot;&quot;) {this.value = &quot;Enter your email...&quot;;}" onfocus="if (this.value == &quot;Enter your email...&quot;) {this.value = &quot;&quot;}" type="text" value="Enter your email..." />
<input alt="" class="btrixsubmit" title="" type="submit" value="Subscribe" />
</form>
</div>
<div style="border: none; color: #666666; font: 22px Oswald, cursive; margin: 25px 0 0 5px;">
Follow us:</div>
<div style="margin: -32px 0 0 120px;">
<a href="http://www.facebook.com/MyGalaxyTricks" target="_blank" title="Join us on Facebook"><img alt="facebook" src="https://blogger.googleusercontent.com/img/b/R29vZ2xl/AVvXsEg_j9f8S_2kG077v1yGIAiWjg8Pbisi310hRzIZaqo5f2HdVg4N9NP-dKYSMLbZ1J4mW7GgKu4rEjFxOZEJLoOaazPX2JahGlHlkgNQI1dp3-fTZLmWTdXZAxEWpHdDXnCkUrmNHoyslf0/s1600/facebook_btrix.png" /></a>
<a href="http://www.twitter.com/MyGalaxyTricks" rel="nofollow" target="_blank" title="Follow us on Twitter"><img alt="twitter" src="https://blogger.googleusercontent.com/img/b/R29vZ2xl/AVvXsEiQV6ZyTDre6CoNNm75fY5133a6JSla-JoRj9XIH8zLwK7aektTqFyioJcBCHONFN2iCisO31uPggmM-0BCfBXfe6iMOo4H_jUA5eZKzmlRLXWvcZX8WYLvWmP0p_8TCcEyFDzglU78E3w/s1600/twitter_btrix.png" /></a>
<a href="https://plus.google.com/Username" rel="nofollow" target="_blank" title="Follow us on Google+"><img alt="gplus" src="https://blogger.googleusercontent.com/img/b/R29vZ2xl/AVvXsEgl1NrWHzGsZhz2sl2pU_CaMyXT7h2PWBDTwPMtRciAdDihyphenhyphenqBTgkruZgWKX85osw61WBC5ah3zKmXEoKwlbhKxRAk7tk-0iV96jfnG9E6bERdvyNPkjCQFb13TDzBZyFAgxUvk6GIBE2Y/s1600/googleplus_btrix.png" /></a>
<a href="http://www.pinterest.com/MyGalaxyTricks" rel="nofollow" target="_blank" title="Follow us on Pinterest"><img alt="pinterest" src="https://blogger.googleusercontent.com/img/b/R29vZ2xl/AVvXsEhEsVFMFhvDH5XBYxYB3iUPhIK6GfxcEYDeKAKrCf6jQA-i7eTCTpefsnInmgnUJ8CBvcxPj43CE1re6bd8favRK7f9el63P5hir5vUWAxq2rqmLzJvh-mC4rWuVdOHRTpa_21uNsDCBEY/s1600/pinterest_btrix.png" /></a>
<a href="http://feeds2.feedburner.com/MyGalaxyTricks" rel="nofollow" target="_blank" title="Subscribe to RSS"><img alt="rss" src="https://blogger.googleusercontent.com/img/b/R29vZ2xl/AVvXsEgd7GHKuY-dxk_np-7kebs8DLuzS52Hi6CaNKxcTVUfRNVl8nGkkfGNcsLpd3abRjzDr8ciylqftF7p6xnJXH6RBiVoWhHKXN41IH2hfgbFJ6Mq60MqckTxInrgY7AagQnSoHuaN-YW3Rk/s1600/rss_btrix.png" /></a>
</div>
<div align="center">
<a href="http://feeds.feedburner.com/MyGalaxyTricks"><img alt="" height="26" src="http://feeds.feedburner.com/~fc/MyGalaxyTricks?bg=FF9900&amp;fg=444444&amp;anim=1" style="border: 0;" width="88" /></a></div>
</div>

6) Replace the MyGalaxyTricks that is in blue color with your usernames.

7) Now Click on Save Changes.

8) Now View Your Blog You Will See The Widget In Your Blog.

If You Have Any Problem Then Comment Below or Contact-Us. Hope this Post will Help You Also Share This Your Friends. EnjoY!!!

How To Add A Social Subscription Box With Social Media Icons In BLogger.

Hello Bloggers, Me Harry and today I provided you a awesome subscription box. In this widget we added social media networks icon so you can also place your social media links here and get more traffic. Social media sites are most important parts of our sites in these days because all peoples use these networks and it is very important to gave the daily users an simple way to subscribe in order to got new and latest updates in their inbox and stay connected with us. So in this box are social media networks are added and you can add this subscription box or widget to your blog from below. Read below and use this widget. We also place a Live Demo below you can check it below.


Learn How To Add This To Your Blog.

1) Open Your Blogger Account.

2) Open Your Layout of Blogger.

3) Click On Add a Gadget Button.

4) Then Click on HTML/Javascripts.


5) Paste The Below Code In It.


<style>
.subscribebtrix {
border: 2px solid #000000;
padding: 8px;
width: 310px;
-webkit-transition: all 0.5s ease-in-out;
-moz-transition: all 0.5s ease-in-out;
-ms-transition: all 0.5s ease-in-out;
-o-transition: all 0.5s ease-in-out;
transition: all 0.5s ease-in-out;
}
.subscribebtrix:hover {
-moz-box-shadow: inset 1px 1px 10px 1px rgba(249, 215, 126, 1);
-webkit-box-shadow: inset 1px 1px 10px 1px rgba(249, 215, 126, 1);
box-shadow: inset 1px 1px 10px 1px rgba(249, 215, 126, 1);
}
.tbimailbox {
border: 1px solid #D3D3D3;
-webkit-border-radius: 4px;
border-radius: 4px;
-moz-box-shadow: 1px 1px 1px 1px rgba(255, 172, 84, 0.4) inset;
-webkit-box-shadow: 1px 1px 1px 1px rgba(0, 0, 0, 0.4) inset;
box-shadow: 1px 1px 1px 1px rgba(0, 0, 0, 0.4) inset;
color: #666;
font: 14px "trebuchet ms", sans-serif;
padding: 7px 15px;
width: 160px;
-webkit-transition: all 0.5s ease-in-out;
-moz-transition: all 0.5s ease-in-out;
-ms-transition: all 0.5s ease-in-out;
-o-transition: all 0.5s ease-in-out;
transition: all 0.5s ease-in-out;
}
.tbimailbox:hover {
-webkit-box-shadow: none;
box-shadow: none;
-webkit-transition: all 0.5s ease-in-out;
-moz-transition: all 0.5s ease-in-out;
-ms-transition: all 0.5s ease-in-out;
-o-transition: all 0.5s ease-in-out;
transition: all 0.5s ease-in-out;
}
.btrixsubmit {
font: bold 12px Tahoma, Geneva, sans-serif;
font-style: normal;
color: #ffffff;
background: #ff5714;
border: 0px solid #ffffff;
text-shadow: 0px -1px 1px #222222;
box-shadow: 2px 2px 5px #000000;
-moz-box-shadow: 2px 2px 5px #000000;
-webkit-box-shadow: 2px 2px 5px #000000;
border-radius: 10px 10px 10px 10px;
-moz-border-radius: 10px 10px 10px 10px;
-webkit-border-radius: 10px 10px 10px 10px;
padding: 8px 15px;
cursor: pointer;
margin: 0 auto;
}
.btrixsubmit:active {
cursor: pointer;
position: relative;
top: 2px;
}
.btrixsubmit::-moz-focus-inner {
border: 0;
padding: 0;
margin: 0;
}
</style>

<br />
<div class="subscribebtrix">
<div style="color: #666666; font-weight: bold; font: 22px Oswald, cursive; margin: 0px 0px 10px 15px;">
Free Updates to your Inbox</div>
<div style="margin: 10px 0 0 6px;">
<form action="http://feedburner.google.com/fb/a/mailverify" class="emailform" method="post" onsubmit="window.open('http://feedburner.google.com/fb/a/mailverify?uri=MyGalaxyTricks', 'popupwindow', 'scrollbars=yes,width=550,height=520');return true" style="margin: 0pt;" target="popupwindow">
<input name="uri" type="hidden" value="MyGalaxyTricks" />
<input name="loc" type="hidden" value="en_US" />
<input class="tbimailbox" name="email" onblur="if (this.value == &quot;&quot;) {this.value = &quot;Enter your email...&quot;;}" onfocus="if (this.value == &quot;Enter your email...&quot;) {this.value = &quot;&quot;}" type="text" value="Enter your email..." />
<input alt="" class="btrixsubmit" title="" type="submit" value="Subscribe" />
</form>
</div>
<div style="border: none; color: #666666; font: 22px Oswald, cursive; margin: 25px 0 0 5px;">
Follow us:</div>
<div style="margin: -32px 0 0 120px;">
<a href="http://www.facebook.com/MyGalaxyTricks" target="_blank" title="Join us on Facebook"><img alt="facebook" src="https://blogger.googleusercontent.com/img/b/R29vZ2xl/AVvXsEg_j9f8S_2kG077v1yGIAiWjg8Pbisi310hRzIZaqo5f2HdVg4N9NP-dKYSMLbZ1J4mW7GgKu4rEjFxOZEJLoOaazPX2JahGlHlkgNQI1dp3-fTZLmWTdXZAxEWpHdDXnCkUrmNHoyslf0/s1600/facebook_btrix.png" /></a>
<a href="http://www.twitter.com/MyGalaxyTricks" rel="nofollow" target="_blank" title="Follow us on Twitter"><img alt="twitter" src="https://blogger.googleusercontent.com/img/b/R29vZ2xl/AVvXsEiQV6ZyTDre6CoNNm75fY5133a6JSla-JoRj9XIH8zLwK7aektTqFyioJcBCHONFN2iCisO31uPggmM-0BCfBXfe6iMOo4H_jUA5eZKzmlRLXWvcZX8WYLvWmP0p_8TCcEyFDzglU78E3w/s1600/twitter_btrix.png" /></a>
<a href="https://plus.google.com/Username" rel="nofollow" target="_blank" title="Follow us on Google+"><img alt="gplus" src="https://blogger.googleusercontent.com/img/b/R29vZ2xl/AVvXsEgl1NrWHzGsZhz2sl2pU_CaMyXT7h2PWBDTwPMtRciAdDihyphenhyphenqBTgkruZgWKX85osw61WBC5ah3zKmXEoKwlbhKxRAk7tk-0iV96jfnG9E6bERdvyNPkjCQFb13TDzBZyFAgxUvk6GIBE2Y/s1600/googleplus_btrix.png" /></a>
<a href="http://www.pinterest.com/MyGalaxyTricks" rel="nofollow" target="_blank" title="Follow us on Pinterest"><img alt="pinterest" src="https://blogger.googleusercontent.com/img/b/R29vZ2xl/AVvXsEhEsVFMFhvDH5XBYxYB3iUPhIK6GfxcEYDeKAKrCf6jQA-i7eTCTpefsnInmgnUJ8CBvcxPj43CE1re6bd8favRK7f9el63P5hir5vUWAxq2rqmLzJvh-mC4rWuVdOHRTpa_21uNsDCBEY/s1600/pinterest_btrix.png" /></a>
<a href="http://feeds2.feedburner.com/MyGalaxyTricks" rel="nofollow" target="_blank" title="Subscribe to RSS"><img alt="rss" src="https://blogger.googleusercontent.com/img/b/R29vZ2xl/AVvXsEgd7GHKuY-dxk_np-7kebs8DLuzS52Hi6CaNKxcTVUfRNVl8nGkkfGNcsLpd3abRjzDr8ciylqftF7p6xnJXH6RBiVoWhHKXN41IH2hfgbFJ6Mq60MqckTxInrgY7AagQnSoHuaN-YW3Rk/s1600/rss_btrix.png" /></a>
</div>
<div align="center">
<a href="http://feeds.feedburner.com/MyGalaxyTricks"><img alt="" height="26" src="http://feeds.feedburner.com/~fc/MyGalaxyTricks?bg=FF9900&amp;fg=444444&amp;anim=1" style="border: 0;" width="88" /></a></div>
</div>

6) Replace the MyGalaxyTricks that is in blue color with your usernames.

7) Now Click on Save Changes.

8) Now View Your Blog You Will See The Widget In Your Blog.

If You Have Any Problem Then Comment Below or Contact-Us. Hope this Post will Help You Also Share This Your Friends. EnjoY!!!

Posted at 21:07 |  by Unknown

0 comments:

Sunday 22 December 2013

Facebook Pop Like Box To Your Blogger/Website
The pop -up as the box is not designed to make your blog the advantages it seems, the widget designed to be more like Facebook . This box also has a close button on the upper right corner . The visitor can close the widget by clicking the close button. Players really annoying popup when visitors appear again and again, but help you in developing your blog and , when used properly . Facebook is a great source of traffic you can submit your blog a good flow of traffic when you have enough fans on your Facebook page . To expand its network and increase Facebook fans of your Facebook page , I brought an elegant popup widget OneTime Facebook Like for your blogger blog listed only once , so you will increase your Facebook fans without irritating dramatically his visitor. Facebook popup widget to store a cookie on the visitor's browser . When readers visit your blog first time Facebook like box is displayed on the player as the visitor navigates to another page or visit later as the picture never appears again if readers do not their browser cookies.


How to install this widget to your blogger/website
Before changing any template is best to keep a backup .. So first backup your template.

1. Go to your Blogger Dashboard Template Editing HTML >>>>
2. Find this code in your template.

</head>

3. Then,  paste the following code before/above </head>

=================================Start Coding==========================================
<script src='https://ajax.googleapis.com/ajax/libs/jquery/1.6.1/jquery.min.js'></script><script src='http://yourjavascript.com/69231961363/jquery-colorbox-min.js' type='text/javascript'/>
<script type='text/javascript'>
jQuery(document).ready(function(){
if (document.cookie.indexOf(&#39;visited=true&#39;) == -1) {
var setDays = 1000*60*60*24*7;
var expires = new Date((new Date()).valueOf() + setDays);
document.cookie = &quot;visited=true;expires=&quot; + expires.toUTCString();
$.colorbox({width:&quot;400px&quot;, height:&quot;430px&quot;, inline:true, href:&quot;#facebook-popup&quot;});
}});</script>
=================================End Coding==========================================

Setting this value will affect cookie soda. I have given the Likebox appear once for the visitor and Likebox reappear after 1 week. If you want to display visitors Likebox after 1 day and then set 7-1. if the value is set to 1, then you can annoy your regular readers.

4. Now Search for </b:skin>.  Press ctrl+F in your html area, hit enter.

=================================Start Coding==========================================
/* Colorbox Core Style: The following CSS is consistent between example themes and should not be altered. */ #colorbox, #cboxOverlay, #cboxWrapper { position: absolute; top: 0; left: 0; z-index: 9999; overflow: hidden; } #cboxOverlay { position: fixed; width: 100%; height: 100%; } #cboxMiddleLeft, #cboxBottomLeft { clear: left; } #cboxContent { position: relative; } #cboxLoadedContent { overflow: auto; -webkit-overflow-scrolling: touch; } #cboxTitle { margin: 0; } #cboxLoadingOverlay, #cboxLoadingGraphic { position: absolute; top: 0; left: 0; width: 100%; height: 100%; } #cboxPrevious, #cboxNext, #cboxClose, #cboxSlideshow { cursor: pointer; } .cboxPhoto { float: left; margin: auto; border: 0; display: block; max-width: none; -ms-interpolation-mode: bicubic; } .cboxIframe { width: 100%; height: 100%; display: block; border: 0; } #colorbox, #cboxContent, #cboxLoadedContent { box-sizing: content-box; -moz-box-sizing: content-box; -webkit-box-sizing: content-box; } /* User Style: Change the following styles to modify the appearance of Colorbox. They are ordered and tabbed in a way that represents the nesting of the generated HTML. */ #cboxOverlay { background: #000; } #colorbox { outline: 0; } #cboxContent { margin-top: 20px; background: #000; } .cboxIframe { background: #fff; } #cboxError { padding: 50px; border: 1px solid #ccc; } #cboxLoadedContent { border: 5px solid #123D60; background: #fff; box-shadow: 3px 3px 3px #fff; } #cboxTitle { position: absolute; top: -20px; left: 0; color: #ccc; } #cboxCurrent { position: absolute; top: -20px; right: 0px; color: #ccc; } #cboxLoadingGraphic { background: url(https://blogger.googleusercontent.com/img/b/R29vZ2xl/AVvXsEgD1WpAYABqgz7PsWxaowvAX2QNEr1MlcZ0azRSWaqmq0kLk3RXU-JEfpnLyR05bBNoZ2SBRN9Rsee6RuPgQUW-7jGn9KOFJqPFQ37z6f6FcT191AI9WuxiUEQYC2MnrcdUX7kG6TMuavdp/s32/loading.gif) no-repeat center center; } /* these elements are buttons, and may need to have additional styles reset to avoid unwanted base styles */ #cboxPrevious, #cboxNext, #cboxSlideshow, #cboxClose { border: 0; padding: 0; margin: 0; overflow: visible; width: auto; background: none; } /* avoid outlines on :active (mouseclick), but preserve outlines on :focus (tabbed navigating) */ #cboxPrevious:active, #cboxNext:active, #cboxSlideshow:active, #cboxClose:active { outline: none; } #cboxSlideshow { position: absolute; top: -20px; right: 90px; color: #fff; } #cboxPrevious { position: absolute; top: 50%; left: 5px; margin-top: -32px; background: url(https://sites.google.com/site/techprevue/home/controls.png) no-repeat top left; width: 28px; height: 65px; text-indent: -9999px; } #cboxPrevious:hover { background-position: bottom left; } #cboxNext { position: absolute; top: 50%; right: 5px; margin-top: -32px; background: url(https://sites.google.com/site/techprevue/home/controls.png) no-repeat top right; width: 28px; height: 65px; text-indent: -9999px; } #cboxNext:hover { background-position: bottom right; } #cboxClose { position: absolute; top: 5px; right: 5px; display: block; background: url(https://blogger.googleusercontent.com/img/b/R29vZ2xl/AVvXsEixpLpWWQkKs1C8NXxW24vC0mW3C0bi16H_kCdPa-VXBWyFDV3aOHTvIPa7x9wrGAW4CEy1DQCl2qLvOWUCAJwS1vN1qpVt6ZXKg75yB1eINWGx09yiCDivyqbXupe_n9XWcjsZaRttJ7fB/s130/controls.png) no-repeat top center; width: 38px; height: 19px; text-indent: -9999px; } #cboxClose:hover { background-position: bottom center; }
=================================End Coding==========================================

6. Save the template and you are penultimate step! Visit her blog to see it working perfectly.
7. Now finally finding this code.

</body>

8. Now paste the following code before closing </body> tag.

=================================Start Coding==========================================
<div style='display:none'>
<div id='facebook-popup' style='background:#fff;position:scroll;z-index:99999;'>
<div style='text-align:center;padding-top:15px'> <h3 style='font-family: &apos;Source Sans Pro&apos;, Sans Serif; Font-size: 18px; font-weight: 300px; '>Receive All Free Updates Via Facebook.</h3>
<iframe allowtransparency='true' frameborder='0' scrolling='no' src='//www.facebook.com/plugins/likebox.php?href=http%3A%2F%2Fwww.facebook.com%2Fmygalaxystricks&amp;width=342&amp;height=300&amp;show_faces=true&amp;colorscheme=light&amp;stream=false&amp;show_border=false&amp;header=false&amp;appId=' style='border:none; overflow:hidden; width:342px; height:300px;'/>
  </div>
  </div>     </div>
=================================End Coding==========================================

Replace mygalaxytricks your Facebook fan page username. Save the template and you're all done. .!

Visit their blogs and see it appear great! Remember the popup is displayed only once. To see it again, you must first remove the cookie from the browser and refresh the page to see it reappear.
I just hope I can find this tutorial easy and exciting though. Please let me know if you need any help. I just hope that you can make strong growth in Facebook fans. We wish you success and peace friends. Stay updated by subscribing to our news feed or email our Facebook page.

How To Add Facebook Popup Like Box To Your Blogger/Website

Facebook Pop Like Box To Your Blogger/Website
The pop -up as the box is not designed to make your blog the advantages it seems, the widget designed to be more like Facebook . This box also has a close button on the upper right corner . The visitor can close the widget by clicking the close button. Players really annoying popup when visitors appear again and again, but help you in developing your blog and , when used properly . Facebook is a great source of traffic you can submit your blog a good flow of traffic when you have enough fans on your Facebook page . To expand its network and increase Facebook fans of your Facebook page , I brought an elegant popup widget OneTime Facebook Like for your blogger blog listed only once , so you will increase your Facebook fans without irritating dramatically his visitor. Facebook popup widget to store a cookie on the visitor's browser . When readers visit your blog first time Facebook like box is displayed on the player as the visitor navigates to another page or visit later as the picture never appears again if readers do not their browser cookies.


How to install this widget to your blogger/website
Before changing any template is best to keep a backup .. So first backup your template.

1. Go to your Blogger Dashboard Template Editing HTML >>>>
2. Find this code in your template.

</head>

3. Then,  paste the following code before/above </head>

=================================Start Coding==========================================
<script src='https://ajax.googleapis.com/ajax/libs/jquery/1.6.1/jquery.min.js'></script><script src='http://yourjavascript.com/69231961363/jquery-colorbox-min.js' type='text/javascript'/>
<script type='text/javascript'>
jQuery(document).ready(function(){
if (document.cookie.indexOf(&#39;visited=true&#39;) == -1) {
var setDays = 1000*60*60*24*7;
var expires = new Date((new Date()).valueOf() + setDays);
document.cookie = &quot;visited=true;expires=&quot; + expires.toUTCString();
$.colorbox({width:&quot;400px&quot;, height:&quot;430px&quot;, inline:true, href:&quot;#facebook-popup&quot;});
}});</script>
=================================End Coding==========================================

Setting this value will affect cookie soda. I have given the Likebox appear once for the visitor and Likebox reappear after 1 week. If you want to display visitors Likebox after 1 day and then set 7-1. if the value is set to 1, then you can annoy your regular readers.

4. Now Search for </b:skin>.  Press ctrl+F in your html area, hit enter.

=================================Start Coding==========================================
/* Colorbox Core Style: The following CSS is consistent between example themes and should not be altered. */ #colorbox, #cboxOverlay, #cboxWrapper { position: absolute; top: 0; left: 0; z-index: 9999; overflow: hidden; } #cboxOverlay { position: fixed; width: 100%; height: 100%; } #cboxMiddleLeft, #cboxBottomLeft { clear: left; } #cboxContent { position: relative; } #cboxLoadedContent { overflow: auto; -webkit-overflow-scrolling: touch; } #cboxTitle { margin: 0; } #cboxLoadingOverlay, #cboxLoadingGraphic { position: absolute; top: 0; left: 0; width: 100%; height: 100%; } #cboxPrevious, #cboxNext, #cboxClose, #cboxSlideshow { cursor: pointer; } .cboxPhoto { float: left; margin: auto; border: 0; display: block; max-width: none; -ms-interpolation-mode: bicubic; } .cboxIframe { width: 100%; height: 100%; display: block; border: 0; } #colorbox, #cboxContent, #cboxLoadedContent { box-sizing: content-box; -moz-box-sizing: content-box; -webkit-box-sizing: content-box; } /* User Style: Change the following styles to modify the appearance of Colorbox. They are ordered and tabbed in a way that represents the nesting of the generated HTML. */ #cboxOverlay { background: #000; } #colorbox { outline: 0; } #cboxContent { margin-top: 20px; background: #000; } .cboxIframe { background: #fff; } #cboxError { padding: 50px; border: 1px solid #ccc; } #cboxLoadedContent { border: 5px solid #123D60; background: #fff; box-shadow: 3px 3px 3px #fff; } #cboxTitle { position: absolute; top: -20px; left: 0; color: #ccc; } #cboxCurrent { position: absolute; top: -20px; right: 0px; color: #ccc; } #cboxLoadingGraphic { background: url(https://blogger.googleusercontent.com/img/b/R29vZ2xl/AVvXsEgD1WpAYABqgz7PsWxaowvAX2QNEr1MlcZ0azRSWaqmq0kLk3RXU-JEfpnLyR05bBNoZ2SBRN9Rsee6RuPgQUW-7jGn9KOFJqPFQ37z6f6FcT191AI9WuxiUEQYC2MnrcdUX7kG6TMuavdp/s32/loading.gif) no-repeat center center; } /* these elements are buttons, and may need to have additional styles reset to avoid unwanted base styles */ #cboxPrevious, #cboxNext, #cboxSlideshow, #cboxClose { border: 0; padding: 0; margin: 0; overflow: visible; width: auto; background: none; } /* avoid outlines on :active (mouseclick), but preserve outlines on :focus (tabbed navigating) */ #cboxPrevious:active, #cboxNext:active, #cboxSlideshow:active, #cboxClose:active { outline: none; } #cboxSlideshow { position: absolute; top: -20px; right: 90px; color: #fff; } #cboxPrevious { position: absolute; top: 50%; left: 5px; margin-top: -32px; background: url(https://sites.google.com/site/techprevue/home/controls.png) no-repeat top left; width: 28px; height: 65px; text-indent: -9999px; } #cboxPrevious:hover { background-position: bottom left; } #cboxNext { position: absolute; top: 50%; right: 5px; margin-top: -32px; background: url(https://sites.google.com/site/techprevue/home/controls.png) no-repeat top right; width: 28px; height: 65px; text-indent: -9999px; } #cboxNext:hover { background-position: bottom right; } #cboxClose { position: absolute; top: 5px; right: 5px; display: block; background: url(https://blogger.googleusercontent.com/img/b/R29vZ2xl/AVvXsEixpLpWWQkKs1C8NXxW24vC0mW3C0bi16H_kCdPa-VXBWyFDV3aOHTvIPa7x9wrGAW4CEy1DQCl2qLvOWUCAJwS1vN1qpVt6ZXKg75yB1eINWGx09yiCDivyqbXupe_n9XWcjsZaRttJ7fB/s130/controls.png) no-repeat top center; width: 38px; height: 19px; text-indent: -9999px; } #cboxClose:hover { background-position: bottom center; }
=================================End Coding==========================================

6. Save the template and you are penultimate step! Visit her blog to see it working perfectly.
7. Now finally finding this code.

</body>

8. Now paste the following code before closing </body> tag.

=================================Start Coding==========================================
<div style='display:none'>
<div id='facebook-popup' style='background:#fff;position:scroll;z-index:99999;'>
<div style='text-align:center;padding-top:15px'> <h3 style='font-family: &apos;Source Sans Pro&apos;, Sans Serif; Font-size: 18px; font-weight: 300px; '>Receive All Free Updates Via Facebook.</h3>
<iframe allowtransparency='true' frameborder='0' scrolling='no' src='//www.facebook.com/plugins/likebox.php?href=http%3A%2F%2Fwww.facebook.com%2Fmygalaxystricks&amp;width=342&amp;height=300&amp;show_faces=true&amp;colorscheme=light&amp;stream=false&amp;show_border=false&amp;header=false&amp;appId=' style='border:none; overflow:hidden; width:342px; height:300px;'/>
  </div>
  </div>     </div>
=================================End Coding==========================================

Replace mygalaxytricks your Facebook fan page username. Save the template and you're all done. .!

Visit their blogs and see it appear great! Remember the popup is displayed only once. To see it again, you must first remove the cookie from the browser and refresh the page to see it reappear.
I just hope I can find this tutorial easy and exciting though. Please let me know if you need any help. I just hope that you can make strong growth in Facebook fans. We wish you success and peace friends. Stay updated by subscribing to our news feed or email our Facebook page.

Posted at 00:11 |  by Unknown

1 comments:

Saturday 21 December 2013


Increase your twitter followers quickly

Social Media is really important for your blog and the list of followers on social networking sites can increase your traffic very easily . Traffic from social media helps us maintain the flow of traffic to our blog. So, today we will discuss how to increase Twitter followers quickly. Twitter can be very important to your marketing efforts in social media. If you build good follow on twitter , then you can help build a lot of regular traffic to your blog, which will be helpful for you to make money with your blog and also to build readers more importantly , if you are looking for blogging full time. There are plenty of online tools that can help increase twitter followers fast as addmefast but one thing is sure that you can increase your followers on Twitter , but it might be fake profiles that are following , and there may be no benefit these followers . So follow these tips to get genuine followers on Twitter.
 
1.
Tweet regularly


If you want to establish your audience you need to tweet regularly. Usually suggest more times a day ( don't get overboard ) . If you have a Twitter account , however , the company is not often used , people can get the idea that your business is not active . You can update or twitter retweets things are relevant to your industry. 


2. Update your brand

You need to use your company logo as your account picture in Facebook . Avoid using photos of several other workers or random images . A Twitter should mean line.


3. Follow influencers and their followers in your niche


There may be a lot of influential people or professional blogger in place so it is good to follow that will help them to increase the scope of your twitter account . You can also follow the followers of the factors of influence because the followers are people like u will follow u back or if they continue . So it will be good if you follow users can add up to how much u want .


4. Type the Twitter bio


Twitter bio is really important to get more followers on your twitter account thing . Writing a good bio about you or your company with good keywords so that if someone searches for a keyword in particular, then there are chances that they find your profile on search and follow you .


5. Make use of hashtags


Hashtags are very important these days. You can use hashtags when you tweet on twitter this will help to increase the reach of your Twitter account and its followers will surely increase . Using hastags help you find people with similar interests in twitter. You can use hashtags in your tweets also, use hastags that are popular at a time so you get the benefit .

How to increase Twitter followers quickly


Increase your twitter followers quickly

Social Media is really important for your blog and the list of followers on social networking sites can increase your traffic very easily . Traffic from social media helps us maintain the flow of traffic to our blog. So, today we will discuss how to increase Twitter followers quickly. Twitter can be very important to your marketing efforts in social media. If you build good follow on twitter , then you can help build a lot of regular traffic to your blog, which will be helpful for you to make money with your blog and also to build readers more importantly , if you are looking for blogging full time. There are plenty of online tools that can help increase twitter followers fast as addmefast but one thing is sure that you can increase your followers on Twitter , but it might be fake profiles that are following , and there may be no benefit these followers . So follow these tips to get genuine followers on Twitter.
 
1.
Tweet regularly


If you want to establish your audience you need to tweet regularly. Usually suggest more times a day ( don't get overboard ) . If you have a Twitter account , however , the company is not often used , people can get the idea that your business is not active . You can update or twitter retweets things are relevant to your industry. 


2. Update your brand

You need to use your company logo as your account picture in Facebook . Avoid using photos of several other workers or random images . A Twitter should mean line.


3. Follow influencers and their followers in your niche


There may be a lot of influential people or professional blogger in place so it is good to follow that will help them to increase the scope of your twitter account . You can also follow the followers of the factors of influence because the followers are people like u will follow u back or if they continue . So it will be good if you follow users can add up to how much u want .


4. Type the Twitter bio


Twitter bio is really important to get more followers on your twitter account thing . Writing a good bio about you or your company with good keywords so that if someone searches for a keyword in particular, then there are chances that they find your profile on search and follow you .


5. Make use of hashtags


Hashtags are very important these days. You can use hashtags when you tweet on twitter this will help to increase the reach of your Twitter account and its followers will surely increase . Using hastags help you find people with similar interests in twitter. You can use hashtags in your tweets also, use hastags that are popular at a time so you get the benefit .

Posted at 03:31 |  by Unknown

0 comments:

Thursday 12 December 2013

keywords

A major source of traffic to your blog will be search engines, especially Google . You can increase the traffic coming to your blog for search engines by applying search engine optimisation (SEO ) tricks on your blog design and writing. You can start doing some keyword research and determine which are likely to drive more traffic to your blog keywords . Then focus on incorporating keywords into your blog using the tricks below.

1. Use keywords in the title of your blog. 


One of the best ways to incorporate keywords in your blog is to use in their titles the blog posts. However, do not sacrifice the ability of a title to motivate people to click through and read the entire blog post . 
 
2 . Focus on the use of only one or two keyword phrases in each blog post . 


To maximise the traffic that comes to your blog through search engines , focus on each of its optimising blog entries by only one or two keyword phrases . Too many keyword phrases dilutes the content of his message to readers and may resemble spam to readers and search engines . You can learn more about how to use specific keywords to maximise search traffic by reading about the search engine optimisation of the long tail.

3. Use keywords throughout your blog. 


Try to use keywords ( without keyword stuffing ) several times in the blog post . For best results, use keywords within the first 200 characters of the blog , several times throughout your post , and near the end of the post . Take time to learn more about keyword stuffing and other prohibitions of search engine optimisation .

4. Use keywords in and around the links on the blog.


Experts believe Optimisation search engines search engines like Google give more weight to linked text than the text which is unlinked while ranking the search engines results. Therefore , it is a good idea to include keywords in or next to the links within your blog when appropriate to do so. Be sure to read about how many links is too much for SEO before you start adding links to your posts .

5. Use keywords in image Alt -tags .


When you upload a picture to your blog to use in your blog post, usually have the option to add alternative text to the image that appears if a visitor can not load your images on their Web browsers. However, this alternative text, you can also help your optimisation efforts of search engines. That's because the alternative text appears within the HTML code of your blog site as something that is called an Alt -tag . Google and other search engines crawl the label and use in providing the results of keyword searches . Take the time to add keywords that are relevant to the image and message Alt -tag for each image you upload and post to your blog.

5 Ways to use keywords in your blog posts

keywords

A major source of traffic to your blog will be search engines, especially Google . You can increase the traffic coming to your blog for search engines by applying search engine optimisation (SEO ) tricks on your blog design and writing. You can start doing some keyword research and determine which are likely to drive more traffic to your blog keywords . Then focus on incorporating keywords into your blog using the tricks below.

1. Use keywords in the title of your blog. 


One of the best ways to incorporate keywords in your blog is to use in their titles the blog posts. However, do not sacrifice the ability of a title to motivate people to click through and read the entire blog post . 
 
2 . Focus on the use of only one or two keyword phrases in each blog post . 


To maximise the traffic that comes to your blog through search engines , focus on each of its optimising blog entries by only one or two keyword phrases . Too many keyword phrases dilutes the content of his message to readers and may resemble spam to readers and search engines . You can learn more about how to use specific keywords to maximise search traffic by reading about the search engine optimisation of the long tail.

3. Use keywords throughout your blog. 


Try to use keywords ( without keyword stuffing ) several times in the blog post . For best results, use keywords within the first 200 characters of the blog , several times throughout your post , and near the end of the post . Take time to learn more about keyword stuffing and other prohibitions of search engine optimisation .

4. Use keywords in and around the links on the blog.


Experts believe Optimisation search engines search engines like Google give more weight to linked text than the text which is unlinked while ranking the search engines results. Therefore , it is a good idea to include keywords in or next to the links within your blog when appropriate to do so. Be sure to read about how many links is too much for SEO before you start adding links to your posts .

5. Use keywords in image Alt -tags .


When you upload a picture to your blog to use in your blog post, usually have the option to add alternative text to the image that appears if a visitor can not load your images on their Web browsers. However, this alternative text, you can also help your optimisation efforts of search engines. That's because the alternative text appears within the HTML code of your blog site as something that is called an Alt -tag . Google and other search engines crawl the label and use in providing the results of keyword searches . Take the time to add keywords that are relevant to the image and message Alt -tag for each image you upload and post to your blog.

Posted at 06:03 |  by Unknown

0 comments:

Saturday 7 December 2013


how to backup a blogger blog

Hey! everyone. 
Today I am going to tell you how to easily backup your Blogger blogs in 3 different modes . Baking a blog is something that should be practiced by every blogger. Although Blogger is owned by Google , and is one of the most secure platforms and can not be easily hacked yet we never know if our password is stolen or mistakenly delete a post .A blogger need to backup your blog regularly and to facilitate this will tell you how to do this using 3 different methods. So here they are -

Method 1: The traditional way


This is definitely the most common method and many of you here know. In this method , we import blog posts and download blog's template from Blogger.com itself .

Here is a step-by-step guide :

1) Go to blogger.com and log in to your account.
2) Go to template section.
3) Click on Backup/restore button.
4) Click on Download full template as shown in the image given below.

Download a blog


Method 2: Download data from Google Dashboard

This is probably the easiest way to backup all staff and posts with a few clicks. So to make backup of this method follow these steps - 


1. First go to Google Dashboard. You will be prompted to sign in there.

2. After logging in , click on " Download Data " link will be on the left sidebar.


3. Click 'Create an archive' button .


4. A list of the many Google products will arrive, in the list select Blogger . After selection , click on the " Create archive" , which will be at the top.


backup a blog

5. After clicking on, a progress bar will show the status of your file being created. After a few seconds a download button will appear. Clicking it again will be asked to register for security reasons .


6. Once you log in again , you can download the backup whole blog you have in your Blogger account with the template and posts. The backup is saved to the local disk .


Method 3 : Backup through software:


The third method is also quite easy. In this method we will use a third party software is Blogger Backup Utility. This software helps you download messages from your Blogger blog ( no backup template ) easily with the help of the power of the blog. You get several options for exercise software . To perform a backup Blogger Backup Utility do the following -

1. Blogger Backup Utility Download from HERE. Extract and install this software.


2. From the available blog's dropdown select Add / Update / Delete option.


3. Enter your ID and password Blogger and wait for the list of blogs to download .


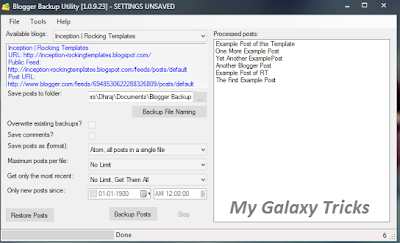
4. Once the process is complete , select the blog you want from the drop down and take a look at the following options, such as how to save the message in single or double file, etc.Backup Software blogs.


Blogger backup utility

5. Finally , click the Messages Backup button and the backup will be saved in the selected folder. That's it. Your posts are now supported and saved on the local disk .

3 easy ways to backup your blog


how to backup a blogger blog

Hey! everyone. 
Today I am going to tell you how to easily backup your Blogger blogs in 3 different modes . Baking a blog is something that should be practiced by every blogger. Although Blogger is owned by Google , and is one of the most secure platforms and can not be easily hacked yet we never know if our password is stolen or mistakenly delete a post .A blogger need to backup your blog regularly and to facilitate this will tell you how to do this using 3 different methods. So here they are -

Method 1: The traditional way


This is definitely the most common method and many of you here know. In this method , we import blog posts and download blog's template from Blogger.com itself .

Here is a step-by-step guide :

1) Go to blogger.com and log in to your account.
2) Go to template section.
3) Click on Backup/restore button.
4) Click on Download full template as shown in the image given below.

Download a blog


Method 2: Download data from Google Dashboard

This is probably the easiest way to backup all staff and posts with a few clicks. So to make backup of this method follow these steps - 


1. First go to Google Dashboard. You will be prompted to sign in there.

2. After logging in , click on " Download Data " link will be on the left sidebar.


3. Click 'Create an archive' button .


4. A list of the many Google products will arrive, in the list select Blogger . After selection , click on the " Create archive" , which will be at the top.


backup a blog

5. After clicking on, a progress bar will show the status of your file being created. After a few seconds a download button will appear. Clicking it again will be asked to register for security reasons .


6. Once you log in again , you can download the backup whole blog you have in your Blogger account with the template and posts. The backup is saved to the local disk .


Method 3 : Backup through software:


The third method is also quite easy. In this method we will use a third party software is Blogger Backup Utility. This software helps you download messages from your Blogger blog ( no backup template ) easily with the help of the power of the blog. You get several options for exercise software . To perform a backup Blogger Backup Utility do the following -

1. Blogger Backup Utility Download from HERE. Extract and install this software.


2. From the available blog's dropdown select Add / Update / Delete option.


3. Enter your ID and password Blogger and wait for the list of blogs to download .


4. Once the process is complete , select the blog you want from the drop down and take a look at the following options, such as how to save the message in single or double file, etc.Backup Software blogs.


Blogger backup utility

5. Finally , click the Messages Backup button and the backup will be saved in the selected folder. That's it. Your posts are now supported and saved on the local disk .

Posted at 19:38 |  by Unknown

0 comments:

Thursday 5 December 2013


How to increase alexa rank of a blog ?

After Google Page Rank the second thing that is given great importance by webmasters is your blog's Alexa Rank.  Trust me most  of them judge your blog / website by just viewing alexa Rank. Even advertisers check your alexa rank while showing ads on your blog. So today, i am going to tell you some effective ways to increase alexa rank.

1.Install Alexa Toolbar: 

Must download and install the Alexa toolbar in your browser and also ask your friends , visitors to install toolbar for their browser.

    Click here to install the Alexa toolbar in your browser.

2.Claim your site:
To obtain total control over your place in Alexa.com.This site.Claim help others to know who owns the site and helps in better ranking on Alexa .

3. Put Alexa widget on your blog:
As I said Alexa count only the hits coming under his system. So put an alexa widget on your blog.

4.Get Traffic Bloggers and Techy boys : 

This is the most important factor that affects your Alexa Rank. If you receive more visitors who are bloggers or web designers then your alexa rank will increase faster because all bloggers and people are installing Techy Alexa widget on their browsers .
 

5.Write comment on your blog:
Write a review on Alexa Ranking and link back to Alexa.com. This is also an important factor which effects your blog's alexa rank.

6.Write posts related blogs and internet marketing:

As people who read messages related to blogging and internet marketing are web masters so if you write messages related to these issues then you will get more visitors who installed Alexa Toolbar on your browser which directly increases your Alexa Ranking .

7.Commenting and Backlinking :
Comment on other blogs that are under the niche blogs and technology with good traffic and also link to your blog. Build more and more links to blogs with good traffic because backlinks are crucial as you may have noticed that alexa even calculates the number of backlinks you have.


8.Update your blog regularly :
You should write frequently to increase your alexa rank or else your Alexa ranking will go down and it is hard to bring back to their new alexa .
 

9.Write quality :
As always say quality matters.If write quality posts that others automatically linked back to you and therefore increase backlinks and traffic and increasing your alexa rank .

10.Share your posts on social networks :
Share your posts on social networks like Facebook , Stumbling and Digg.These sites not only brings massive traffic but also helps to increase your Alexa ranking .


Must read : Tips for better SEO

How to increase alexa rank of your blog


How to increase alexa rank of a blog ?

After Google Page Rank the second thing that is given great importance by webmasters is your blog's Alexa Rank.  Trust me most  of them judge your blog / website by just viewing alexa Rank. Even advertisers check your alexa rank while showing ads on your blog. So today, i am going to tell you some effective ways to increase alexa rank.

1.Install Alexa Toolbar: 

Must download and install the Alexa toolbar in your browser and also ask your friends , visitors to install toolbar for their browser.

    Click here to install the Alexa toolbar in your browser.

2.Claim your site:
To obtain total control over your place in Alexa.com.This site.Claim help others to know who owns the site and helps in better ranking on Alexa .

3. Put Alexa widget on your blog:
As I said Alexa count only the hits coming under his system. So put an alexa widget on your blog.

4.Get Traffic Bloggers and Techy boys : 

This is the most important factor that affects your Alexa Rank. If you receive more visitors who are bloggers or web designers then your alexa rank will increase faster because all bloggers and people are installing Techy Alexa widget on their browsers .
 

5.Write comment on your blog:
Write a review on Alexa Ranking and link back to Alexa.com. This is also an important factor which effects your blog's alexa rank.

6.Write posts related blogs and internet marketing:

As people who read messages related to blogging and internet marketing are web masters so if you write messages related to these issues then you will get more visitors who installed Alexa Toolbar on your browser which directly increases your Alexa Ranking .

7.Commenting and Backlinking :
Comment on other blogs that are under the niche blogs and technology with good traffic and also link to your blog. Build more and more links to blogs with good traffic because backlinks are crucial as you may have noticed that alexa even calculates the number of backlinks you have.


8.Update your blog regularly :
You should write frequently to increase your alexa rank or else your Alexa ranking will go down and it is hard to bring back to their new alexa .
 

9.Write quality :
As always say quality matters.If write quality posts that others automatically linked back to you and therefore increase backlinks and traffic and increasing your alexa rank .

10.Share your posts on social networks :
Share your posts on social networks like Facebook , Stumbling and Digg.These sites not only brings massive traffic but also helps to increase your Alexa ranking .


Must read : Tips for better SEO

Posted at 04:38 |  by Unknown

0 comments:

Monday 2 December 2013


How to get discovered by Google

Hello everyone! I Sunil here, and today I am writing a very helpful post for new bloggers. One of the major problem that most of the beginners found is that their site do not get indexed by Google. So, I am going to tell you about how to get discovered by Google robot. Here are some great ways. The best part is that some of the following will help you get referral traffic to your new website too!
 

1)  Create a Site Map :
  
A site map is an XML document on the server of your website basically lists each page in your website. Search engines are informed when you have added new pages and how often to check back for updates on specific pages . For example , you may want a search engine to return and check your home page every day new products , news and new content. If your blog is based on WordPress, you need to install the Google XML Sitemaps plugin and have it automatically create and update your site map for you and submit it to search engines . You can also use tools such as XML Sitemaps Generator.

2) 
Submit Sitemap to Google Webmaster Tools : 


The first place you should take your sitemap for a new website is Google Webmaster Tools. If you do not already have one, just create a free Google account , then enroll in Webmaster Tools . Add your new site to Google Webmaster Tools , then go to the optimization > sitemaps and add the link to your site map to Google Webmaster Tools to notify the respect and the pages you have already posted . For extra credit , create an account with Bing and submit your sitemap to them via their webmaster tools .

3)
Setup Google Analytics :


You want to do this for monitoring purposes , regardless , but Google could certainly give the heads up that a new website is on the horizon . So I advise you to install Google Analytics.

4)
Submit website URL to search engines :


Some people suggest that you to do not do it simply because there are many other ways to get the tracker a search engine for your website . But it only takes a moment , and certainly does not hurt things. So submit your website URL to Google by signing into your Google account and accessing the Send the URL in Google Webmaster Tools . For extra credit , submit your site to Bing. You can use this tool anonymity URL below Webmaster Tools go - this too shall submit it to Yahoo .

5)
Create or Update social profiles :


As mentioned above , the crawlers come to your site through links . One way to get some quick links is by creating social networking profiles for your new website or add a link to your new pre - existing site profiles site . This includes Twitter profiles , Facebook pages , Google+ profiles or pages, LinkedIn profiles or corporate sites, profiles Pinterest, and YouTube channels .

6) Share Your New Website Link:


Once you have added to your new web site link to a new or existing social profile , share in an update to these networks. While these links are no-follow , will remain the alert search engines that are following social cues . For options , attach a picture of the website and YouTube, create a video of the introduction of its new website and include a link to it in the video description.

7)
Bookmark It


Use quality social bookmarking sites like Delicious and StumbleUpon . It also have a good impact on your site's indexing.


8) Create External Content :

Again, to help in the process of link building, get more links to your new website by creating content outside facilities such as submitting guest posts to blogs your niche , the articles to quality article directories and press releases to services that offer SEO and distribution. Note that this is a quality content from quality sites - you do not want the content of spam spam sites because that just tells Google that your website is spam.

How to get your new Website discovered by Google


How to get discovered by Google

Hello everyone! I Sunil here, and today I am writing a very helpful post for new bloggers. One of the major problem that most of the beginners found is that their site do not get indexed by Google. So, I am going to tell you about how to get discovered by Google robot. Here are some great ways. The best part is that some of the following will help you get referral traffic to your new website too!
 

1)  Create a Site Map :
  
A site map is an XML document on the server of your website basically lists each page in your website. Search engines are informed when you have added new pages and how often to check back for updates on specific pages . For example , you may want a search engine to return and check your home page every day new products , news and new content. If your blog is based on WordPress, you need to install the Google XML Sitemaps plugin and have it automatically create and update your site map for you and submit it to search engines . You can also use tools such as XML Sitemaps Generator.

2) 
Submit Sitemap to Google Webmaster Tools : 


The first place you should take your sitemap for a new website is Google Webmaster Tools. If you do not already have one, just create a free Google account , then enroll in Webmaster Tools . Add your new site to Google Webmaster Tools , then go to the optimization > sitemaps and add the link to your site map to Google Webmaster Tools to notify the respect and the pages you have already posted . For extra credit , create an account with Bing and submit your sitemap to them via their webmaster tools .

3)
Setup Google Analytics :


You want to do this for monitoring purposes , regardless , but Google could certainly give the heads up that a new website is on the horizon . So I advise you to install Google Analytics.

4)
Submit website URL to search engines :


Some people suggest that you to do not do it simply because there are many other ways to get the tracker a search engine for your website . But it only takes a moment , and certainly does not hurt things. So submit your website URL to Google by signing into your Google account and accessing the Send the URL in Google Webmaster Tools . For extra credit , submit your site to Bing. You can use this tool anonymity URL below Webmaster Tools go - this too shall submit it to Yahoo .

5)
Create or Update social profiles :


As mentioned above , the crawlers come to your site through links . One way to get some quick links is by creating social networking profiles for your new website or add a link to your new pre - existing site profiles site . This includes Twitter profiles , Facebook pages , Google+ profiles or pages, LinkedIn profiles or corporate sites, profiles Pinterest, and YouTube channels .

6) Share Your New Website Link:


Once you have added to your new web site link to a new or existing social profile , share in an update to these networks. While these links are no-follow , will remain the alert search engines that are following social cues . For options , attach a picture of the website and YouTube, create a video of the introduction of its new website and include a link to it in the video description.

7)
Bookmark It


Use quality social bookmarking sites like Delicious and StumbleUpon . It also have a good impact on your site's indexing.


8) Create External Content :

Again, to help in the process of link building, get more links to your new website by creating content outside facilities such as submitting guest posts to blogs your niche , the articles to quality article directories and press releases to services that offer SEO and distribution. Note that this is a quality content from quality sites - you do not want the content of spam spam sites because that just tells Google that your website is spam.

Posted at 07:26 |  by Unknown

0 comments:

Receive All Free Updates Via Facebook.