All Stories

Sunday 19 January 2014

 facebook comment box for wordpress
About 90% of us have a Facebook profile. Facebook users are much more than Google+  users. So, it will be better to let your visitors comment on your blog with their facebook account. It will help you in increasing the number of comments on your blog. In this post I will tell you how to add a facebook comment box to your Wordpress blog.

Step by step guide to add a Facebook comment box to wordpress blog:

1. Click here to download the plugin.

2. Sign in to your wordpress account.

3. Go to plugins and click on 'Add new' and then upload the plugin you have downloaded from the above link.

4. Activate you plugin.

5. After installing the plugin, Click here.

6. Register your account to Facebook developers. ( If you don't have one )


7. Now click on 'Create new app' button.


8. Fill your desired app name and App space name and click on continue. For example :

9. Select a category, you can choose app for pages and click on continue. 

10. Now add your blog's URL in your app as given below.

Please note: Type your Blog's URL without 'http://'

11. Now click on 'Add a platform' and select 'Website'.

12. Now enter you blog's URL and save changes.

13. Now copy your app ID.

14. Go back to Facebook comment box plugin settings, scroll down and find the main settings.

15. Paste your app ID into that box and save.

Congrats! you have done.

I hope this article will be helpful for you. Please leave a review.

How to add facebook comment box in a wordpress blog

 facebook comment box for wordpress
About 90% of us have a Facebook profile. Facebook users are much more than Google+  users. So, it will be better to let your visitors comment on your blog with their facebook account. It will help you in increasing the number of comments on your blog. In this post I will tell you how to add a facebook comment box to your Wordpress blog.

Step by step guide to add a Facebook comment box to wordpress blog:

1. Click here to download the plugin.

2. Sign in to your wordpress account.

3. Go to plugins and click on 'Add new' and then upload the plugin you have downloaded from the above link.

4. Activate you plugin.

5. After installing the plugin, Click here.

6. Register your account to Facebook developers. ( If you don't have one )


7. Now click on 'Create new app' button.


8. Fill your desired app name and App space name and click on continue. For example :

9. Select a category, you can choose app for pages and click on continue. 

10. Now add your blog's URL in your app as given below.

Please note: Type your Blog's URL without 'http://'

11. Now click on 'Add a platform' and select 'Website'.

12. Now enter you blog's URL and save changes.

13. Now copy your app ID.

14. Go back to Facebook comment box plugin settings, scroll down and find the main settings.

15. Paste your app ID into that box and save.

Congrats! you have done.

I hope this article will be helpful for you. Please leave a review.

Posted at 01:38 |  by Unknown

0 comments:

Wednesday 15 January 2014

Google webmaster tools

As I mentioned in my earlier post that I will soon write an article on how to submit a sitemap to Google Webmasters. So, today I am going to do that.
To index any Website on Google and to increase its traffic you must need to submit a sitemap. It helps you in  indexing your blog's pages and  posts.        But before submitting a sitemap, we need to verify our  blog on Google Webmasters.

How to verify a blog/Website on Google Webmaster tools ?


1) Go to Webmaster tools and log in to your account.

2) After log in, you will see your all blogs there.

3) Click on manage site option and then click on verify this site.


4) Now you will be provided 2 methods, recommended method and alternative method. Choose the alternative method.

5) Copy the meta tag and paste it below the <head> section of your template's HTML as shown in the picture below.


 6) Save your template and go to webmaster tools from where you have copied the meta tag and click on verify.

You have done! and now i will tell you how to submit a sitemap.

How to submit a sitemap to Google Webmasters tools ?

1) Go to Webmaster tools and click on 'crawl' and then click on 'sitemaps'.


2) Click on add/test sitemap and paste the following code in the given box.

atom.xml?redirect=false&start-index=1&max-results=500
Add sitemap

Please note: The above code is only for the posts from 1 to 500. If you have more posts than 500 than you change its value. For example if you want to submit a sitemap for posts 500 to 1000 than you can use the following code.

atom.xml?redirect=false&start-index=501&max-results=1000

3) Click on 'submit sitemap' and you have done!

How to submit a blogger sitemap to Google Webmasters

Google webmaster tools

As I mentioned in my earlier post that I will soon write an article on how to submit a sitemap to Google Webmasters. So, today I am going to do that.
To index any Website on Google and to increase its traffic you must need to submit a sitemap. It helps you in  indexing your blog's pages and  posts.        But before submitting a sitemap, we need to verify our  blog on Google Webmasters.

How to verify a blog/Website on Google Webmaster tools ?


1) Go to Webmaster tools and log in to your account.

2) After log in, you will see your all blogs there.

3) Click on manage site option and then click on verify this site.


4) Now you will be provided 2 methods, recommended method and alternative method. Choose the alternative method.

5) Copy the meta tag and paste it below the <head> section of your template's HTML as shown in the picture below.


 6) Save your template and go to webmaster tools from where you have copied the meta tag and click on verify.

You have done! and now i will tell you how to submit a sitemap.

How to submit a sitemap to Google Webmasters tools ?

1) Go to Webmaster tools and click on 'crawl' and then click on 'sitemaps'.


2) Click on add/test sitemap and paste the following code in the given box.

atom.xml?redirect=false&start-index=1&max-results=500
Add sitemap

Please note: The above code is only for the posts from 1 to 500. If you have more posts than 500 than you change its value. For example if you want to submit a sitemap for posts 500 to 1000 than you can use the following code.

atom.xml?redirect=false&start-index=501&max-results=1000

3) Click on 'submit sitemap' and you have done!

Posted at 05:34 |  by Unknown
0 comments:

Tuesday 14 January 2014

As we all knows the importance of rss feeds for a blog. So it will be better for you to let your visitors subscribe your blog with email. I am talking about a good looking jqery widget. This widget will let your visitors to subscribe your blog and get daily updates via rss feeds.

email pop up subscription box


Here is a step by step guide to install an email subscription pop up box for your blog:

Note: Before you install this widget I advise you to backup your template so that if anything went wrong, you can set it right by re uploading your template. So, first backup your template.


1. log in to your blog and go to template.

2. Click on edit html.

3. Now press ctrl+f an look for the following code.
</head>
 4. Now paste the following code above the </head >
<script                                                                                                                                src='https://ajax.googleapis.com/ajax/libs/jquery/1.6.1/jquery.min.js'></script><scrip t src='http://yourjavascript.com/69231961363/jquery-colorbox-min.js'                             type='text/javascript'/>                                                                                                     
<script type='text/javascript'>                                                                                          
jQuery(document).ready(function(){                                                                               
if (document.cookie.indexOf(&#39;visited=true&#39;) == -1) {                                   
var setDays = 1000*60*60*24*7;                                                                                   
var expires = new Date((new Date()).valueOf() + setDays);                                      
document.cookie = &quot;visited=true;expires=&quot; + expires.toUTCString();
$.colorbox({width:&quot;395px&quot;, height:&quot;435px&quot;, inline:true, href:&quot;#email-popup&quot;});
}});</script>

5. If you change the value of highlighted number (7)in the above code it will effect cookie refreshment. Actually it's the no. of days after which the pop up box can reappear to the same visitor. For example, if you set it 7 then if it appear once to the visitor then it will re appear after a week i.e.after 7 days.


6. Now again press ctrl+F and search for the following code:
</b:skin>
7. Click on the black arrow to expand the code and paste the following code in it :
#subscriptionwrap {
    width: 600px;
    background: #e9e9e9;
    padding: 15px;
    margin: 14px;
    border: 1px solid #ddd;
    -webkit-border-radius: 4px;
    -moz-border-radius: 4px;
    border-radius: 4px;
    -webkit-box-shadow: 0 1px 0px #f9f9f9 inset,1px 1px 1px rgba(223,223,223,0.4);
    -moz-box-shadow: 0 1px 0px #f9f9f9 inset,1px 1px 1px rgba(223,223,223,0.4);
    box-shadow: 0 1px 0px #f9f9f9 inset,1px 1px 1px rgba(223,223,223,0.4);
}
.subscriptionbox h4 {
    font-size: 30px;
    font-family: 'Verdana', Arial;
    font-variant: small-caps;
    margin: 0 auto;
    text-align: center;
    line-height: 30px;
    color: #333;
    font-weight: 600;
    text-shadow: 1px 1px 5px #333;
    text-decoration: none !important;
}
.subscriptionbox p {
    font-family: geogia;
    font-style: italic;
    font-size: 26px;
    text-align: center;
    margin: 0px;
    line-height: 30px;
    margin-top: 25px;
    border-bottom: 1px solid #333;
    color: #454545;
    padding-bottom: 20px;
}
.emailbutton1 {
    background: #f7f8f9;
    background: -webkit-linear-gradient(top,#f7f8f9 0%,#e9e9e9 100%);
    background: -moz-linear-gradient(top,#f7f8f9 0%,#e9e9e9 100%);
    background: -o-linear-gradient(top,#f7f8f9 0%,#e9e9e9 100%);
    background: -ms-linear-gradient(top,#f7f8f9 0%,#e9e9e9 100%);
    background: linear-gradient(top,#f7f8f9 0%,#e9e9e9 100%);
    filter: progid:DXImageTransform.Microsoft.gradient( startColorstr="#f7f8f9",endColorstr="#e9e9e9",GradientType=0 );
    border: 1px solid #ddd;
    -webkit-border-top-right-radius: 4px;
    -moz-border-top-right-radius: 4px;
    border-top-right-radius: 4px;
    -webkit-border-bottom-right-radius: 4px;
    -moz-border-bottom-right-radius: 4px;
    border-bottom-right-radius: 4px;
    -webkit-box-shadow: 0 1px 0 #f9f9f9 inset,1px 1px 1px rgba(223,223,223,0.4);
    -moz-box-shadow: 0 1px 0 #f9f9f9 inset,1px 1px 1px rgba(223,223,223,0.4);
    box-shadow: 0 1px 0 #f9f9f9 inset,1px 1px 1px rgba(223,223,223,0.4);
    color: #888 !important;
    text-shadow: 0 1px 0 #fff;
    line-height: 1.5;
    top: 0px;
    margin: 10px 0 0 -15px;
    cursor: pointer;
    padding: 18px 15px 15px 15px !important;
    font-size: 14px;
    font-weight: bold;
    text-decoration: none !important;
}
.emailbutton1:hover {
    background: #f1f1f1;
    background: -webkit-linear-gradient(top,#f1f1f1 0%,#e0e0e0 100%);
    background: -moz-linear-gradient(top,#f1f1f1 0%,#e0e0e0 100%);
    background: -o-linear-gradient(top,#f1f1f1 0%,#e0e0e0 100%);
    background: -ms-linear-gradient(top,#f1f1f1 0%,#e0e0e0 100%);
    background: linear-gradient(top,#f1f1f1 0%,#e0e0e0 100%);
    filter: progid:DXImageTransform.Microsoft.gradient( startColorstr="#f1f1f1",endColorstr="#e0e0e0",GradientType=0 );
    text-decoration: none !important;
}
.emailinput1 {
       width: 490px !important;     height: 37px;    padding-right: 30px !important;
    float: left;
    margin: 10px 0 0 0px;
    padding: 8px 40px 8px 10px;
    border: 1px solid #d2d2d2;
    background: #fff;
    font-family: georgia;
    font-style: italic;
    font-size: 16px;
    color: #949494;
    -webkit-border-radius: 4px;
    -moz-border-radius: 4px;
    border-radius: 4px;
    text-decoration: none!important;
}
8. Save your template and you are almost done.


9. Now search for the </body> in your template and paste the following code above it:
  <div style='display:none'>
<div id='email-popup' style='position:scroll; z-index:99999;'>
<div id='subscriptionwrap'>
<div class='subscriptionbox'>
<h4>Ready To Be Make <strong>Elegant Blog</strong></h4>
<p>Subscribe to My Galaxy Tricks to get free updates</p>
<form action='http://feedburner.google.com/fb/a/mailverify' class='emailform1' method='post' onsubmit='window.open(&quot;http://feedburner.google.com/fb/a/mailverify?uri=bloggingtricks&quot;, &quot;popupwindow&quot;, &quot;scrollbars=yes,width=550,height=520&quot;);return true' target='popupwindow'>
<input name='uri' type='hidden' value='galaxytricks'/>
<input name='loc' type='hidden' value='en_US'/>
<input class='emailinput1' name='email' onblur='if (this.value == &quot;&quot;) {this.value = &quot;Enter your email...&quot;;}' onfocus='if (this.value == &quot;Enter your email...&quot;) {this.value = &quot;&quot;}' type='text' value='Enter your email...'/>
<input class='emailbutton1' title='' type='submit' value='SignUp'/>
</form>
</div>
</div>
  </div>
  </div>
10. Now you need to make the following changes in the above code:


  • Replace the green colored text with anything that you like.
  • Replace the red colored text with your Blog's title.
  • Replace bloggingrtricks with your own Feedburner email link.
  • Replace galaxy tricks with your own Feedburner title.
11. Save your template and you have done.

If you face any problem while creating an email pop up subscription box for your blog, feel free to ask us.

How to create an email popup subscription box for your blog

As we all knows the importance of rss feeds for a blog. So it will be better for you to let your visitors subscribe your blog with email. I am talking about a good looking jqery widget. This widget will let your visitors to subscribe your blog and get daily updates via rss feeds.

email pop up subscription box


Here is a step by step guide to install an email subscription pop up box for your blog:

Note: Before you install this widget I advise you to backup your template so that if anything went wrong, you can set it right by re uploading your template. So, first backup your template.


1. log in to your blog and go to template.

2. Click on edit html.

3. Now press ctrl+f an look for the following code.
</head>
 4. Now paste the following code above the </head >
<script                                                                                                                                src='https://ajax.googleapis.com/ajax/libs/jquery/1.6.1/jquery.min.js'></script><scrip t src='http://yourjavascript.com/69231961363/jquery-colorbox-min.js'                             type='text/javascript'/>                                                                                                     
<script type='text/javascript'>                                                                                          
jQuery(document).ready(function(){                                                                               
if (document.cookie.indexOf(&#39;visited=true&#39;) == -1) {                                   
var setDays = 1000*60*60*24*7;                                                                                   
var expires = new Date((new Date()).valueOf() + setDays);                                      
document.cookie = &quot;visited=true;expires=&quot; + expires.toUTCString();
$.colorbox({width:&quot;395px&quot;, height:&quot;435px&quot;, inline:true, href:&quot;#email-popup&quot;});
}});</script>

5. If you change the value of highlighted number (7)in the above code it will effect cookie refreshment. Actually it's the no. of days after which the pop up box can reappear to the same visitor. For example, if you set it 7 then if it appear once to the visitor then it will re appear after a week i.e.after 7 days.


6. Now again press ctrl+F and search for the following code:
</b:skin>
7. Click on the black arrow to expand the code and paste the following code in it :
#subscriptionwrap {
    width: 600px;
    background: #e9e9e9;
    padding: 15px;
    margin: 14px;
    border: 1px solid #ddd;
    -webkit-border-radius: 4px;
    -moz-border-radius: 4px;
    border-radius: 4px;
    -webkit-box-shadow: 0 1px 0px #f9f9f9 inset,1px 1px 1px rgba(223,223,223,0.4);
    -moz-box-shadow: 0 1px 0px #f9f9f9 inset,1px 1px 1px rgba(223,223,223,0.4);
    box-shadow: 0 1px 0px #f9f9f9 inset,1px 1px 1px rgba(223,223,223,0.4);
}
.subscriptionbox h4 {
    font-size: 30px;
    font-family: 'Verdana', Arial;
    font-variant: small-caps;
    margin: 0 auto;
    text-align: center;
    line-height: 30px;
    color: #333;
    font-weight: 600;
    text-shadow: 1px 1px 5px #333;
    text-decoration: none !important;
}
.subscriptionbox p {
    font-family: geogia;
    font-style: italic;
    font-size: 26px;
    text-align: center;
    margin: 0px;
    line-height: 30px;
    margin-top: 25px;
    border-bottom: 1px solid #333;
    color: #454545;
    padding-bottom: 20px;
}
.emailbutton1 {
    background: #f7f8f9;
    background: -webkit-linear-gradient(top,#f7f8f9 0%,#e9e9e9 100%);
    background: -moz-linear-gradient(top,#f7f8f9 0%,#e9e9e9 100%);
    background: -o-linear-gradient(top,#f7f8f9 0%,#e9e9e9 100%);
    background: -ms-linear-gradient(top,#f7f8f9 0%,#e9e9e9 100%);
    background: linear-gradient(top,#f7f8f9 0%,#e9e9e9 100%);
    filter: progid:DXImageTransform.Microsoft.gradient( startColorstr="#f7f8f9",endColorstr="#e9e9e9",GradientType=0 );
    border: 1px solid #ddd;
    -webkit-border-top-right-radius: 4px;
    -moz-border-top-right-radius: 4px;
    border-top-right-radius: 4px;
    -webkit-border-bottom-right-radius: 4px;
    -moz-border-bottom-right-radius: 4px;
    border-bottom-right-radius: 4px;
    -webkit-box-shadow: 0 1px 0 #f9f9f9 inset,1px 1px 1px rgba(223,223,223,0.4);
    -moz-box-shadow: 0 1px 0 #f9f9f9 inset,1px 1px 1px rgba(223,223,223,0.4);
    box-shadow: 0 1px 0 #f9f9f9 inset,1px 1px 1px rgba(223,223,223,0.4);
    color: #888 !important;
    text-shadow: 0 1px 0 #fff;
    line-height: 1.5;
    top: 0px;
    margin: 10px 0 0 -15px;
    cursor: pointer;
    padding: 18px 15px 15px 15px !important;
    font-size: 14px;
    font-weight: bold;
    text-decoration: none !important;
}
.emailbutton1:hover {
    background: #f1f1f1;
    background: -webkit-linear-gradient(top,#f1f1f1 0%,#e0e0e0 100%);
    background: -moz-linear-gradient(top,#f1f1f1 0%,#e0e0e0 100%);
    background: -o-linear-gradient(top,#f1f1f1 0%,#e0e0e0 100%);
    background: -ms-linear-gradient(top,#f1f1f1 0%,#e0e0e0 100%);
    background: linear-gradient(top,#f1f1f1 0%,#e0e0e0 100%);
    filter: progid:DXImageTransform.Microsoft.gradient( startColorstr="#f1f1f1",endColorstr="#e0e0e0",GradientType=0 );
    text-decoration: none !important;
}
.emailinput1 {
       width: 490px !important;     height: 37px;    padding-right: 30px !important;
    float: left;
    margin: 10px 0 0 0px;
    padding: 8px 40px 8px 10px;
    border: 1px solid #d2d2d2;
    background: #fff;
    font-family: georgia;
    font-style: italic;
    font-size: 16px;
    color: #949494;
    -webkit-border-radius: 4px;
    -moz-border-radius: 4px;
    border-radius: 4px;
    text-decoration: none!important;
}
8. Save your template and you are almost done.


9. Now search for the </body> in your template and paste the following code above it:
  <div style='display:none'>
<div id='email-popup' style='position:scroll; z-index:99999;'>
<div id='subscriptionwrap'>
<div class='subscriptionbox'>
<h4>Ready To Be Make <strong>Elegant Blog</strong></h4>
<p>Subscribe to My Galaxy Tricks to get free updates</p>
<form action='http://feedburner.google.com/fb/a/mailverify' class='emailform1' method='post' onsubmit='window.open(&quot;http://feedburner.google.com/fb/a/mailverify?uri=bloggingtricks&quot;, &quot;popupwindow&quot;, &quot;scrollbars=yes,width=550,height=520&quot;);return true' target='popupwindow'>
<input name='uri' type='hidden' value='galaxytricks'/>
<input name='loc' type='hidden' value='en_US'/>
<input class='emailinput1' name='email' onblur='if (this.value == &quot;&quot;) {this.value = &quot;Enter your email...&quot;;}' onfocus='if (this.value == &quot;Enter your email...&quot;) {this.value = &quot;&quot;}' type='text' value='Enter your email...'/>
<input class='emailbutton1' title='' type='submit' value='SignUp'/>
</form>
</div>
</div>
  </div>
  </div>
10. Now you need to make the following changes in the above code:


  • Replace the green colored text with anything that you like.
  • Replace the red colored text with your Blog's title.
  • Replace bloggingrtricks with your own Feedburner email link.
  • Replace galaxy tricks with your own Feedburner title.
11. Save your template and you have done.

If you face any problem while creating an email pop up subscription box for your blog, feel free to ask us.

Posted at 00:17 |  by Unknown

0 comments:

Saturday 11 January 2014


Google, Yahoo and Bing


Receiving traffic on your Blog begins with being listed on search results of Google, Yahoo and Bing and the very first step to get better rank and to get your site online on Bing, Yahoo and Google, you need to submit a sitemap on them. After submitting your site you will also get some general information such as the number of Website connecting you, total number of internal links, etc. So today, I am going to write about how to submit your blog's sitemap on Bing and Yahoo only but very soon I will also write an article on submitting a sitemap to Google webmasters.


How to submit a blog on Bing and Yahoo ?

Since Yahoo has joined hands with Bing, our work become more easier because you only need to submit a sitemap of your blog to Bing and it will automatically set live on both Bing and Yahoo.

Here is a step-by-step guide to submit a Blog/Website on Bing:


1) Log in to Webmaster tools of Bing with your live or Hotmail account.

2) After you sign in, you will see a number of options there.

3) Now enter your Blog's URL and click on 'Add'.


Submit your Website


4) You will see a form, fill it with the correct information.

Bing form


5) Now in sitemap tab, paste the following code:
http://mygalaxytricks.blogspot.com/atom.xml?redirect=false&start-index=1&max-results=500
Note: Replace the underlined words (mygalaxytricks.blogspot.com) with your own Website or Blog's domain. 

6) After completing the form click on save and you will be on the verification page.

7) Now you have to verify that you are the true owner of the Blog that you are going to submit on Bing. They will give you three different ways of verifying your ownership. Choose the second (copy and paste) option.

8) You will be provided an HTML code, paste the given code under the <head> section of your Blog's template.

Please note: After submitting a sitemap, search engines might take several days (approximately 3 days) to index your Website.


Related post : Get your new Website discovered by Google

How to submit a sitemap on bing and yahoo


Google, Yahoo and Bing


Receiving traffic on your Blog begins with being listed on search results of Google, Yahoo and Bing and the very first step to get better rank and to get your site online on Bing, Yahoo and Google, you need to submit a sitemap on them. After submitting your site you will also get some general information such as the number of Website connecting you, total number of internal links, etc. So today, I am going to write about how to submit your blog's sitemap on Bing and Yahoo only but very soon I will also write an article on submitting a sitemap to Google webmasters.


How to submit a blog on Bing and Yahoo ?

Since Yahoo has joined hands with Bing, our work become more easier because you only need to submit a sitemap of your blog to Bing and it will automatically set live on both Bing and Yahoo.

Here is a step-by-step guide to submit a Blog/Website on Bing:


1) Log in to Webmaster tools of Bing with your live or Hotmail account.

2) After you sign in, you will see a number of options there.

3) Now enter your Blog's URL and click on 'Add'.


Submit your Website


4) You will see a form, fill it with the correct information.

Bing form


5) Now in sitemap tab, paste the following code:
http://mygalaxytricks.blogspot.com/atom.xml?redirect=false&start-index=1&max-results=500
Note: Replace the underlined words (mygalaxytricks.blogspot.com) with your own Website or Blog's domain. 

6) After completing the form click on save and you will be on the verification page.

7) Now you have to verify that you are the true owner of the Blog that you are going to submit on Bing. They will give you three different ways of verifying your ownership. Choose the second (copy and paste) option.

8) You will be provided an HTML code, paste the given code under the <head> section of your Blog's template.

Please note: After submitting a sitemap, search engines might take several days (approximately 3 days) to index your Website.


Related post : Get your new Website discovered by Google

Posted at 01:33 |  by Unknown

0 comments:

Monday 6 January 2014


"How to expand Facebook fan page likes ?" This is one of the most frequently asked questions. Everyone wants to increase/expand their Facebook page likes. In this post I am going to share a few tips with you, I hope these tips will help you in gaining page likes.

1) Update your info :

The first thing you need to do after creating a page is to update you basic information. It includes profile picture, cover photo, brief description and other details that you want to provide to your visitors. Remember your cover photo and profile picture must be related to your page.

2) Share your page in groups :

Share your page in different groups, so that more people can know about your page and people of similar interest can like your page to stay updated with your new posts. Also ask your friends to share your posts on their own timeline.

3) Share your page in bigger pages :

This is one of  the most effective way to increase your page likes. In this way you need to contact the Managers or admins of the popular pages and ask them for sharing your page. I advise you to firstly build a good relationship with the admins of popular pages and with other Bloggers. If you do this you will have a greater chance of your page being shared on other pages.

4) Invite your Friends :

Must invite your friends to like your page. You can get some free likes instantly by asking your friends to like your page. You can invite your friends from 'page settings' of your page.

5) Updating your page regularly :

This is one of the most necessary step to get more likes. You will need to post your articles daily. This will help you in making your page more engaging.

6) Post images :

In my advice, in place of putting direct links you need to put some images. Images will attract your visitors and if anyone like your image, it would also be sent to the friends of that person through their news feed and hence you will get more page likes and your blog traffic will also increase.

7)  Facebook like box or popup box :

Place a popup or like box on your blog. This will let your visitors to know about your fan page and you will get more likes. It is estimated that a popup box can increase the rate of likes up to 50%.


How to increase facebook page likes


"How to expand Facebook fan page likes ?" This is one of the most frequently asked questions. Everyone wants to increase/expand their Facebook page likes. In this post I am going to share a few tips with you, I hope these tips will help you in gaining page likes.

1) Update your info :

The first thing you need to do after creating a page is to update you basic information. It includes profile picture, cover photo, brief description and other details that you want to provide to your visitors. Remember your cover photo and profile picture must be related to your page.

2) Share your page in groups :

Share your page in different groups, so that more people can know about your page and people of similar interest can like your page to stay updated with your new posts. Also ask your friends to share your posts on their own timeline.

3) Share your page in bigger pages :

This is one of  the most effective way to increase your page likes. In this way you need to contact the Managers or admins of the popular pages and ask them for sharing your page. I advise you to firstly build a good relationship with the admins of popular pages and with other Bloggers. If you do this you will have a greater chance of your page being shared on other pages.

4) Invite your Friends :

Must invite your friends to like your page. You can get some free likes instantly by asking your friends to like your page. You can invite your friends from 'page settings' of your page.

5) Updating your page regularly :

This is one of the most necessary step to get more likes. You will need to post your articles daily. This will help you in making your page more engaging.

6) Post images :

In my advice, in place of putting direct links you need to put some images. Images will attract your visitors and if anyone like your image, it would also be sent to the friends of that person through their news feed and hence you will get more page likes and your blog traffic will also increase.

7)  Facebook like box or popup box :

Place a popup or like box on your blog. This will let your visitors to know about your fan page and you will get more likes. It is estimated that a popup box can increase the rate of likes up to 50%.


Posted at 06:12 |  by Unknown

0 comments:

Saturday 4 January 2014

how to install a blogger template

Hi bloggers!
I Sunil here, and today, in this post i will show you how to install a custom blogger template. Most of us know about it but still i am writing it for those who are new and don't know about it. This procedure sly depending on several factors such as on your existing widgets and also on the quality of code in your new template. So, in my opinion you need to be careful while changing the template. I advise you to backup your blog's template first. 

How to install a blogger template?

Here is a step-by-step guide to install a custom blogger template easily:

1) Login to your account and then go to 'Template'.

How to install a custom blogger template
2) Click on Backup / Restore, which is at the top right corner of the blog.


3) Now click on 'Browse' and choose your desired template that you want to upload / install on your blog.


4) After selecting the template click on 'Upload' as shown in the screenshot given below.

6) That's it your new template is now on your blog.

I hope this post will help you in uploading or installing a new template to your blog.

How to install a custom blogger template to your blog

how to install a blogger template

Hi bloggers!
I Sunil here, and today, in this post i will show you how to install a custom blogger template. Most of us know about it but still i am writing it for those who are new and don't know about it. This procedure sly depending on several factors such as on your existing widgets and also on the quality of code in your new template. So, in my opinion you need to be careful while changing the template. I advise you to backup your blog's template first. 

How to install a blogger template?

Here is a step-by-step guide to install a custom blogger template easily:

1) Login to your account and then go to 'Template'.

How to install a custom blogger template
2) Click on Backup / Restore, which is at the top right corner of the blog.


3) Now click on 'Browse' and choose your desired template that you want to upload / install on your blog.


4) After selecting the template click on 'Upload' as shown in the screenshot given below.

6) That's it your new template is now on your blog.

I hope this post will help you in uploading or installing a new template to your blog.

Posted at 00:52 |  by Unknown

0 comments:

Friday 3 January 2014

Increase google+ followers

Even the foremost hard-headed social media enthusiast would agree that Google+ will never be half of the maximum amount fun as Facebook or Twitter are. Perhaps instagram and pinterest can be in near future. While casual surfers will decide and select the network they need to or the one which they enjoy most, on-line entrepreneurs, bloggers and net marketers can't ignore Google+

Since additional G+ shares will improve your program rankings, generate traffic to your web site and create your posts or articles additional visible across Google search, it make sense to work hard on increasing the quantity of Google plus followers.


“How to extend your Google plus followers ?” can might be a question for new users of Google+. Even we though haven't too many followers but this is only because we have not still focused on Google+ but we'll start it very soon. In this post I am going to share some tips with you that would be helpful in increasing your Google+ followers


How to Increase Google plus followers ?


Here are some tips that you need to explore (if you have got not done that therefore far) to boost your G+ presence:


1) Complete your Google+ profile

While most of us create a G+ profile, not everyone move and complete it by furnishing all the details like education, address, employers, adding a profile image, etc.
Select the “Edit profile” to feature all relevant details to your profile. Additionally, watch out to furnish details of all websites and blogs to that you contribute often by adding to the “Contributor Section”. this can be of utmost importance to claim your Google authorship.


2) Integrate G+ profile with different social networks

Integrate your Google+ profile with different social media networking Websites like facebook, twitter, etc. This will create your profile look additional authentic and can therefore assist you attract additional G+ followers within the long-standing time.


3) Follow others

You are possible to be followed back by individuals whom you follow.
Look for those who share identical or similar interests as you and follow them. Besides the likelihood of obtaining additional followers, it'll assist you get additional exposure in your chosen field.


4) Help other peoples

Merely making a G+ profile and not functioning on it'll get you obscurity. Spend some time on your profile everyday to assist others.
If you are, for example, an affiliate marketer, explore for those who have posted any questions related to Affiliate promoting or area unit yearning for data on it topic. offer them meaty data on it topic, in order that they'll need to follow you back.


5) Invite individuals to follow you

Must add your Google and profile link to your Author Bio/description, and with your email signature and invite all friends and family to follow you on Google plus. it might be an honest plan to put them during a totally different circle although, and not within the same circle as your business acquaintances or on-line contacts in order that their profiles don't get spammed by your posts that don't interest them.


6) Add a Google+ badge

Besides that, adding the Google and badge to your blog or web site extremely helps. You'll be able to add one by finding out on the widgets in your Dashboard. If you find the way to place your “Facebook Like box” this could be straightforward for you.

7) be part of Google and communities

Share your posts, views, ideas and opinions with compatible individuals by connexion Google and communities with similar or same interests as yours. you'll be able to even produce your own community and invite individuals to hitch it.

Related post: How to create a Google+ (plus) fan page for your blog.

7 Tips to increase Google+ followers

Increase google+ followers

Even the foremost hard-headed social media enthusiast would agree that Google+ will never be half of the maximum amount fun as Facebook or Twitter are. Perhaps instagram and pinterest can be in near future. While casual surfers will decide and select the network they need to or the one which they enjoy most, on-line entrepreneurs, bloggers and net marketers can't ignore Google+

Since additional G+ shares will improve your program rankings, generate traffic to your web site and create your posts or articles additional visible across Google search, it make sense to work hard on increasing the quantity of Google plus followers.


“How to extend your Google plus followers ?” can might be a question for new users of Google+. Even we though haven't too many followers but this is only because we have not still focused on Google+ but we'll start it very soon. In this post I am going to share some tips with you that would be helpful in increasing your Google+ followers


How to Increase Google plus followers ?


Here are some tips that you need to explore (if you have got not done that therefore far) to boost your G+ presence:


1) Complete your Google+ profile

While most of us create a G+ profile, not everyone move and complete it by furnishing all the details like education, address, employers, adding a profile image, etc.
Select the “Edit profile” to feature all relevant details to your profile. Additionally, watch out to furnish details of all websites and blogs to that you contribute often by adding to the “Contributor Section”. this can be of utmost importance to claim your Google authorship.


2) Integrate G+ profile with different social networks

Integrate your Google+ profile with different social media networking Websites like facebook, twitter, etc. This will create your profile look additional authentic and can therefore assist you attract additional G+ followers within the long-standing time.


3) Follow others

You are possible to be followed back by individuals whom you follow.
Look for those who share identical or similar interests as you and follow them. Besides the likelihood of obtaining additional followers, it'll assist you get additional exposure in your chosen field.


4) Help other peoples

Merely making a G+ profile and not functioning on it'll get you obscurity. Spend some time on your profile everyday to assist others.
If you are, for example, an affiliate marketer, explore for those who have posted any questions related to Affiliate promoting or area unit yearning for data on it topic. offer them meaty data on it topic, in order that they'll need to follow you back.


5) Invite individuals to follow you

Must add your Google and profile link to your Author Bio/description, and with your email signature and invite all friends and family to follow you on Google plus. it might be an honest plan to put them during a totally different circle although, and not within the same circle as your business acquaintances or on-line contacts in order that their profiles don't get spammed by your posts that don't interest them.


6) Add a Google+ badge

Besides that, adding the Google and badge to your blog or web site extremely helps. You'll be able to add one by finding out on the widgets in your Dashboard. If you find the way to place your “Facebook Like box” this could be straightforward for you.

7) be part of Google and communities

Share your posts, views, ideas and opinions with compatible individuals by connexion Google and communities with similar or same interests as yours. you'll be able to even produce your own community and invite individuals to hitch it.

Related post: How to create a Google+ (plus) fan page for your blog.

Posted at 05:47 |  by Unknown

0 comments:

Thursday 2 January 2014

Google+ page

Google plus (+) has launched fan pages for Google+ users. It is a business solution for sharing photos, news and events and for promoting products to your fans and customers. It's just like as Facebook fan page which helps you to increase your blog traffic and popularising your blog. In this post i am going to tell you about how to create a Google+ fan page.

Here is a step-by-step guide to create Google+ page.

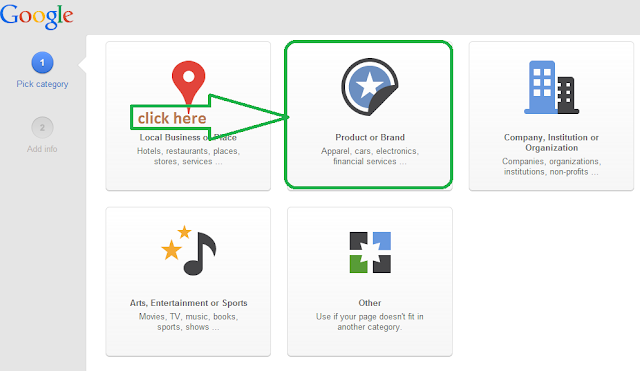
1) Click here and then click on 'Product or brand'.

Brand or product

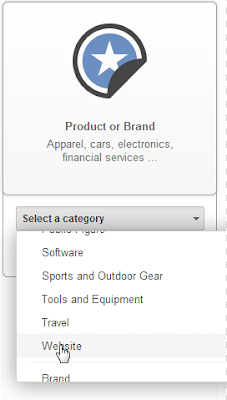
2) Select your category as Website or if you are going to sell a product or if your website provides any service than there are many such categories present in the list.

Google plus page

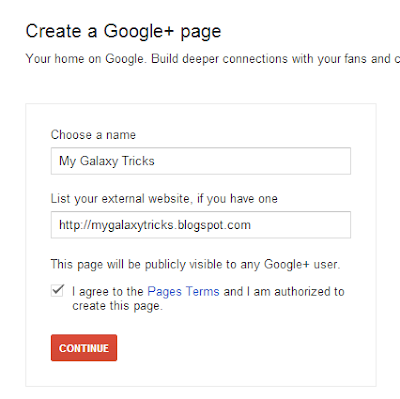
3) Enter your blog's title and URL as shown below. Accept the page terms and click on continue.


Blog title and URL

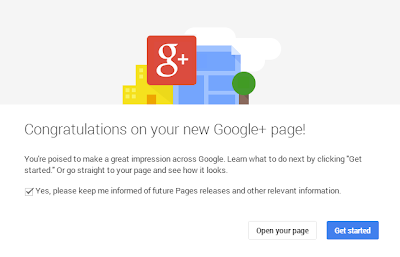
4) Now click on 'Open your page'. Your google+ page is almost created.


how to create a google plus page

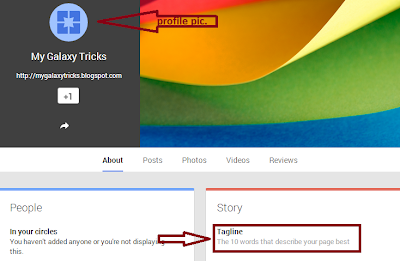
5) Add a profile picture (if any) and enter the tagline of your blog. The tag line is a small description about your blog which let visitor to know about the aim of your blog.

Google+ page

6) Your Google+ page is created. Now, in order to popularise it and get more likes share it with your Google+ circles and also create a Google+ fan badge 
on your site.

I hope this post will help you in creating a G+ fan page for your blog. If you have any question regarding to this article, don't hesitate to ask us.

How to create a google+ fan page for your blog

Google+ page

Google plus (+) has launched fan pages for Google+ users. It is a business solution for sharing photos, news and events and for promoting products to your fans and customers. It's just like as Facebook fan page which helps you to increase your blog traffic and popularising your blog. In this post i am going to tell you about how to create a Google+ fan page.

Here is a step-by-step guide to create Google+ page.

1) Click here and then click on 'Product or brand'.

Brand or product

2) Select your category as Website or if you are going to sell a product or if your website provides any service than there are many such categories present in the list.

Google plus page

3) Enter your blog's title and URL as shown below. Accept the page terms and click on continue.


Blog title and URL

4) Now click on 'Open your page'. Your google+ page is almost created.


how to create a google plus page

5) Add a profile picture (if any) and enter the tagline of your blog. The tag line is a small description about your blog which let visitor to know about the aim of your blog.

Google+ page

6) Your Google+ page is created. Now, in order to popularise it and get more likes share it with your Google+ circles and also create a Google+ fan badge 
on your site.

I hope this post will help you in creating a G+ fan page for your blog. If you have any question regarding to this article, don't hesitate to ask us.

Posted at 07:17 |  by Unknown

0 comments:

Receive All Free Updates Via Facebook.